


组件间通信
props
方式
一个组件里面引入另外一个组件,此时构成了一种“父子关系”,当前组件为“父”,引入的组件为“子”,如当前组件(父),在父组件中通过 :message向子组件通信。
父组件 Parent.vue
<template> <div class="parent-box"> <div> <div>我是父组件</div> <div>{{ message }}</div> </div> <children :message="toChildrenMsg"></children> </div></template>
<script> import Children from './Children.vue' //当前页引入子组件 export default { name: 'Parent', components: { Children, }, data() { return { message: '我是父组件的内容', toChildrenMsg: '从父组件传过到子组件的内容', } }, }</script>子组件 Children.vue
<template> <div class="children-box"> <div> <div>我是子组件</div> <div>{{ message }}</div> </div> </div></template>
<script> export default { name: 'Children', props: { message: { type: String, //类型判断 default: '', //默认值 }, }, }</script>在子组件通过props进行接收,注意子组件props里面接收的对象名称必须与父组件中在子组件绑定的名称一致,当前例子为message,可以在组件中this.message的方式使用props里面的值。
优缺点
-
此方式用于父组件向子组件传递数据
-
所有标签属性都会成为组件对象的属性,模板组件可以直接引用
-
问题:
a. 如果需要向非子后代传递数据必须多层逐层传递
b. 兄弟组件间也不能直接 props 通信,必须借助父组件才可以
自定义事件
组件自定义事件是一种组件间通信的方式,适用于:子组件 ===> 父组件
使用场景
A是父组件,B是子组件,B想给A传数据,那么就要在A中给B绑定自定义事件(事件的回调在A中)。
第一种绑定方式
在父组件中:<Demo @hello="test"/>或 <Demo v-on:hello="test"/>
App.vue
<template> <div class="app"> <!-- 通过父组件给子组件绑定一个自定义事件实现:子给父传递数据(第一种写法,使用@或v-on) --> <Student @atguigu="getStudentName"/> </div></template>
<script> import Student from './components/Student'
export default { name:'App', components:{Student}, data() { return { msg:'你好啊!', studentName:'' } }, methods: { getStudentName(name,...params){ console.log('App收到了学生名:',name,params) this.studentName = name } } }</script>Student.vue
<template> <div class="student"> <button @click="sendStudentlName">把学生名给App</button> </div></template>
<script> export default { name:'Student', data() { return { name:'张三', } }, methods: { sendStudentlName(){ //触发Student组件实例身上的atguigu事件 this.$emit('atguigu',this.name,666,888,900) } }, }</script>
<style lang="less" scoped> .student{ background-color: pink; padding: 5px; margin-top: 30px; }</style>当子组件Student.vue触发点击事件时,Student.vue中$emit执行,触发 App.vue组件上Student组件实例身上的atguigu事件,将this.$emit('atguigu',this.name,666,888,900)中,需要的参数交给App.vue以实现子组件向父组件传参。
第二种绑定方式
在父组件中:使用 this.$refs.xxx.$on()
这样写起来更灵活,比如可以加定时器啥的。
App.vue
<template> <div class="app"> <!-- 通过父组件给子组件绑定一个自定义事件实现:子给父传递数据(第二种写法,使用ref) --> <Student ref="student"/> </div></template>
<script> import Student from './components/Student'
export default { name:'App', components:{Student}, data() { return { studentName:'' } }, methods: { getStudentName(name,...params){ console.log('App收到了学生名:',name,params) this.studentName = name }, }, mounted() { this.$refs.student.$on('atguigu',this.getStudentName) //绑定自定义事件 // this.$refs.student.$once('atguigu',this.getStudentName) //绑定自定义事件(一次性) }, }</script>Student.vue
<template> <div class="student"> <button @click="sendStudentlName">把学生名给App</button> </div></template>
<script> export default { name:'Student', data() { return { name:'张三', } }, methods: { sendStudentlName(){ //触发Student组件实例身上的atguigu事件 this.$emit('atguigu',this.name,666,888,900) } }, }</script>上述实例代码中,在父组件 App.vue 中为 Student组件取别名 <Student ref="student"/>,通过this.$refs.student.$on('atguigu',this.getStudentName)绑定自定义事件 atguigu ,然后在子组件Student中触发事件传参
注意:通过
this.$refs.xxx.$on('atguigu',回调)绑定自定义事件时,回调要么配置在methods中,要么用箭头函数,否则this指向会出问题!
解绑自定义事件
解绑自定义事件,this.$off('atguigu')
this.$off('atguigu') //解绑一个自定义事件// this.$off(['atguigu','demo']) //解绑多个自定义事件// this.$off() //解绑所有的自定义事件在绑定自定义事件后,如果组价执行完毕,在beforeDestroy钩子中解绑自定义事件,防止冲突
全局事件总线
全局事件总线是一种组件间通信的方式,适用于任意组件间通信。
安装全局事件总线
在main.js中,创建 Vue实例时,使用Vue.prototype.$bus = this
new Vue({ el:'#app', render: h => h(App), beforeCreate() { Vue.prototype.$bus = this //安装全局事件总线,$bus就是当前应用的vm },})使用全局事件总线
-
接收数据:A组件想接收数据,则在A组件中给
$bus绑定自定义事件,事件的回调留在A组件自身。methods(){demo(data){}}//mounted() {this.$bus.$on('xxxx',this.demo)} -
提供数据:
this.$bus.$emit('xxxx',数据) -
最好在
beforeDestroy钩子中,用$off去解绑当前组件所用到的事件。
实例代码
School.vue
<template> <div class="school"> <h2>学校名称:{{name}}</h2> <h2>学校地址:{{address}}</h2> </div></template>
<script> export default { name:'School', data() { return { name:'尚硅谷', address:'北京', } }, methods: { demo(data) { console.log('我是School组件,收到了数据',data) } } mounted() { // 在接收数据的组件上绑定事件 this.$bus.$on('hello',this.demo) }, beforeDestroy() { // 解绑事件 this.$bus.$off('hello') }, }</script>Student.vue
<template> <div class="student"> <h2>学生姓名:{{name}}</h2> <h2>学生性别:{{sex}}</h2> <button @click="sendStudentName">把学生名给School组件</button> </div></template>
<script> export default { name:'Student', data() { return { name:'张三', sex:'男', } }, methods: { sendStudentName(){ // 触发想接收数据的组件上的事件,传入想发送的数据 this.$bus.$emit('hello',this.name) } }, }</script>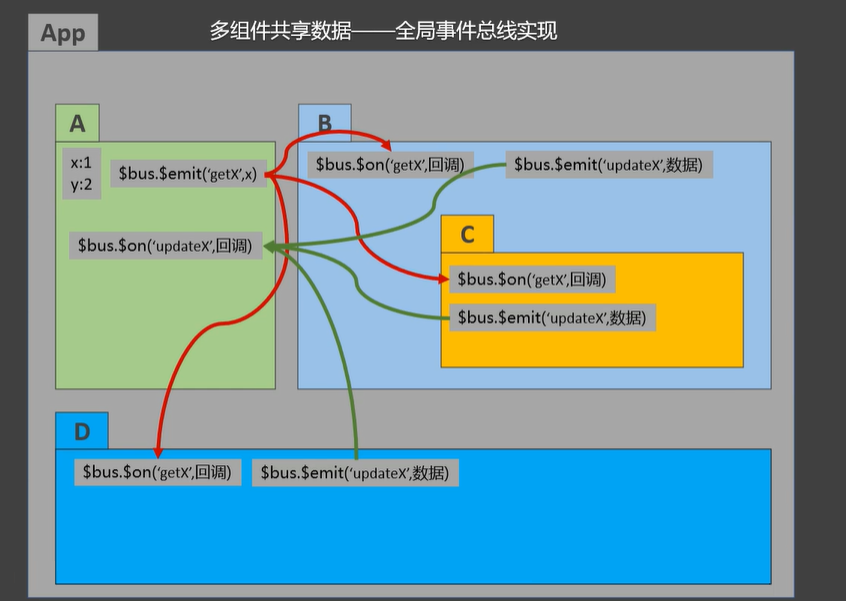
消息订阅与发布
一种组件间通信的方式,适用于任意组件间通信。
使用方法
-
安装pubsub:
npm i pubsub-js -
引入:
import pubsub from 'pubsub-js' -
接收数据:A组件想接收数据,则在A组件中订阅消息,订阅的回调留在A组件自身。
import PubSub from 'pubsub-js' //引入PubSub.subscribe('delete', function(msg, data){ }) //订阅PubSub.publish('delete', data) //发布消息 -
提供数据:
pubsub.publish('xxx',数据) -
最好在beforeDestroy钩子中,用
PubSub.unsubscribe(pid)去取消订阅。
实例代码
订阅消息School.vue
<template> <div class="school"> <h2>学校名称:{{name}}</h2> <h2>学校地址:{{address}}</h2> </div></template>
<script> import pubsub from 'pubsub-js' export default { name:'School', data() { return { name:'尚硅谷', address:'北京', } }, mounted() { /* this.$bus.$on('hello',(data)=>{ console.log('我是School组件,收到了数据',data) }) */ this.pubId = pubsub.subscribe('hello',(msgName,data)=>{ console.log(this) // console.log('有人发布了hello消息,hello消息的回调执行了',msgName,data) }) }, beforeDestroy() { // this.$bus.$off('hello') pubsub.unsubscribe(this.pubId) }, }</script>发布消息Student.vue
<template> <div class="student"> <h2>学生姓名:{{name}}</h2> <h2>学生性别:{{sex}}</h2> <button @click="sendStudentName">把学生名给School组件</button> </div></template>
<script> import pubsub from 'pubsub-js' export default { name:'Student', data() { return { name:'张三', sex:'男', } }, mounted() { // console.log('Student',this.x) }, methods: { sendStudentName(){ // this.$bus.$emit('hello',this.name) pubsub.publish('hello',666) } }, }</script>slot插槽
-
插槽(slot)是 vue 为组件的封装者提供的能力。允许开发者在封装组件时,把不确定的、希望由用户指定的部分定义为插槽。可以把插槽认为是组件封装期间,为用户预留的内容的占位符。
-
作用:让父组件可以向子组件指定位置插入html结构,也是一种组件间通信的方式,适用于 父组件 ===> 子组件 。
-
分类:默认插槽、具名插槽、作用域插槽
-
注意:插槽内容是在父组件中编译后, 再传递给子组件的。
基本用法
vue 官方规定:每一个 slot 插槽,都要有一个 name 名称
如果省略了 slot 的 name 属性,则有一个默认名称叫做 default
在封装组件时,可以通过 <slot></slot> 元素定义插槽,从而为用户预留内容占位符。
如果在父组件引用子组件中没有结构,则会显示子组件中插槽<slot></slot>的内容
默认插槽
// 父组件中:<Category> <div>html结构1</div></Category>//子组件中:<template> <div> <!-- 定义插槽 --> <slot>插槽默认内容...</slot> </div></template>具名插槽
-
子组件:如果在封装组件时需要预留多个插槽节点,则需要为每个
<slot></slot>插槽指定具体的name名称。这种带有具体名称的插槽叫做“具名插槽”。 -
父组件:在向具名插槽提供内容的时候,我们可以在一个
<template>元素上使用v-slot指令,并以v-slot的参数的形式提供其名称,v-slot也有缩写,即把参数之前的所有内容v-slot:替换为字符#
注意:没有指定 name 名称的插槽,会有隐含的名称叫做 default
// 父组件中:<Category> <template slot="center"> <div>html结构1</div> </template>
<template v-slot:header> <div>html结构2</div> </template>
<template #footer> <div>html结构3</div> </template></Category>// 子组件中:<template> <div> <!-- 定义插槽 --> <slot name="center">插槽默认内容1...</slot> <slot name="header">插槽默认内容2...</slot> <slot name="footer">插槽默认内容3...</slot> </div></template>作用域插槽
理解:数据在组件的自身(子组件),但根据数据生成的结构需要组件的使用者(父组件)来决定。(games数据在Category(子)组件中,但使用数据所遍历出来的结构由App(父)组件决定)
// 父组件中:<Category> <template scope="scopeData"> <!-- 生成的是ul列表 --> <ul> <li v-for="g in scopeData.games" :key="g">{{g}}</li> </ul> </template></Category>
<Category> <template slot-scope="scopeData"> <!-- 生成的是h4标题 --> <h4 v-for="g in scopeData.games" :key="g">{{g}}</h4> </template></Category>
// 子组件中:<template> <div> <!-- 通过数据绑定就可以把子组件的数据传到父组件 --> <slot :games="games"></slot> </div></template>
<script> export default { name: 'Category', props: ['title'], //数据在子组件自身 data() { return { games: ['红色警戒', '穿越火线', '劲舞团', '超级玛丽'], } }, }</script>文章分享
如果这篇文章对你有帮助,欢迎分享给更多人!